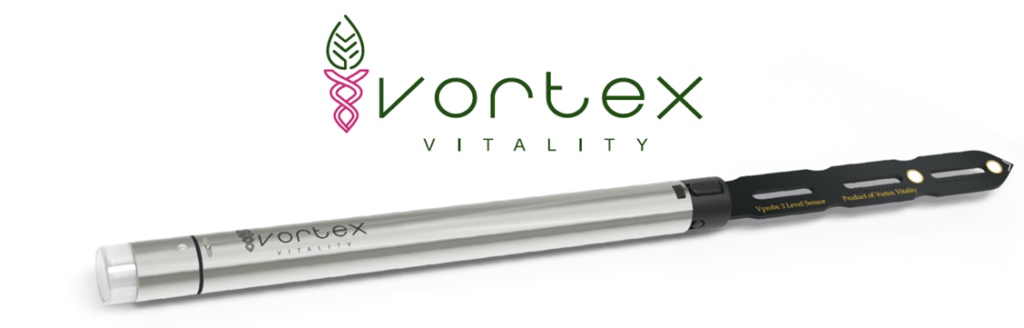
Vprobe Model 1
Now with Fertility Sensor
Designed in the UK
Thank you for purchasing the Vprobe – product of Vortex Vitality. We proud to handover this voluble gift to you 😊. We designed it with love for you to remember the magnificence of our nature, it’s internal and external, all around, and always was. We thrive when we are in balance. The plants are here to heal us, you may just don’t remember it yet!
Table of Contents
- Vprobe Model 1
- How to start using the product
- Product description
- Specification
- Water Ingress Protection
- Sensors location and accuracy
- Other sensors
- Caution
- Batteries Replacement
- Fault Finding (Vprobe LED indication)
- Factory Reset
- Product compliance
- Contact details
How to start using the product
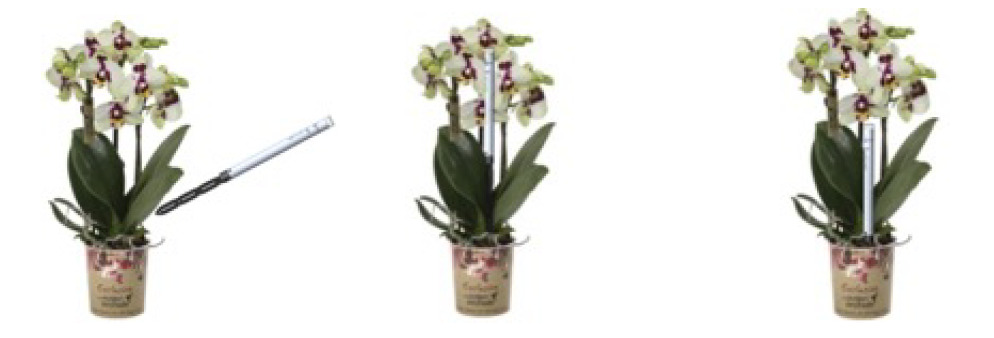
1) Pull out the main Vprobe part (with Vortex Vitality logo) from the box and remove the battery isolator tab
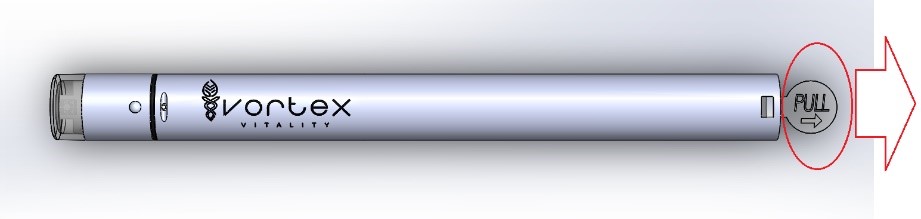
2) Pull out the second Soil Sensor part from the box and attach it to the main part gently until it locks well

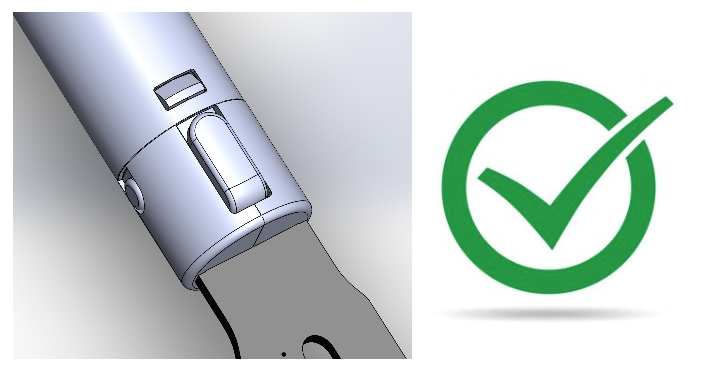
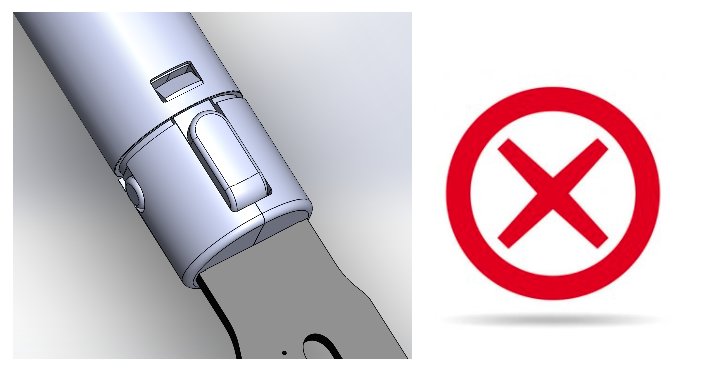
NOTE: not properly locked sensor may leak water inside the product and result in product damage.
3) Locate the plant and insert the Soil Sensor into the soil next to it.
Advisory: Depending on the pot size we recommend placing the Soil Sensor not too close to the plant steam but rather in the free from leaves and other obstacles area and no closer than 1 inch away from the walls of the pot.
4) Download the “Vplants” App from the Apple App Store for iPhone or Google Play Store for Android phone and follow the instruction in the App to add a new plant and start using the product.
5) Thank you!
Product description
The Vprobe is a house plant care product. A wireless and intelligent soil moisture sensor knowing what your plant needs most. Looking after the house plants has never been easier! Just insert the sensor into the soil, set it up by connecting to the internet over Wi-Fi, and receive notification to your phone when plant care is needed. We take care of knowing the rest and we aim to keep things simple for you. You do not need to know anything about plants just enjoy the experience and feel the connection. Take a part of nature to your flat or house and stay in tune. Live a positive life full of harmony and happiness. Your plant will speak for itself when care is required. 😊
Specification
- Size: Length 265mm, Diameter 14mm
- Weight: 60g (with 2x AAA batteries installed)
- Materials: Aluminium, ABS and PC
- Ingress Protection: IP65 -Totally dust proof. Protection against water projected from a nozzle
- Operating Temperature Range: 0 to +55 °C
- Technology: IoT, access to internet over WiFi
- Wi-Fi security: WPA, WPA2, and WPA3 networks. Not compatible with open or older WEP networks.
Water Ingress Protection
The Vortex Vitality Vprobe is engineered with an IP65 rating, providing robust protection against dust and water splashes. However, prolonged water exposure can damage the product. To ensure optimal performance and longevity of your Vprobe, please follow these usage guidelines:
- Indoor Use: Perfect for indoor applications where it is completely shielded from outdoor elements.
- Greenhouse Use: Suitable for use in greenhouses, offering protection from direct water exposure and heavy rain.
- Outdoor Use with Cover: When using the Vprobe outdoors, make sure it is placed under a canopy, roof, or any overhead cover to safeguard it from heavy rain and consistent water exposure.
- Avoid Heavy Rain: Do not expose the Vprobe to open, heavy rain. While it can withstand water splashes, prolonged and direct water ingress may damage the product.
Sensors location and accuracy
All sensors are factory calibrated to provide the best readings possible. The product uses the high quality and high accuracy OEM IC (Integrated Circuit) type sensors for the light, humidity and temperature measurements. Additionally, it relies on the high accuracy and unique design of 3-level soil moisture sensor and its temperature sensor.
For the detailed specification about the light, temperature and humidity sensors refer to the OEM manufacturer specification as per part numbers listed below:
- Light sensor: OEM part number LTR-329ALS-01
- Air temperature and humidity sensor: OEM part number HDC1080DMBT
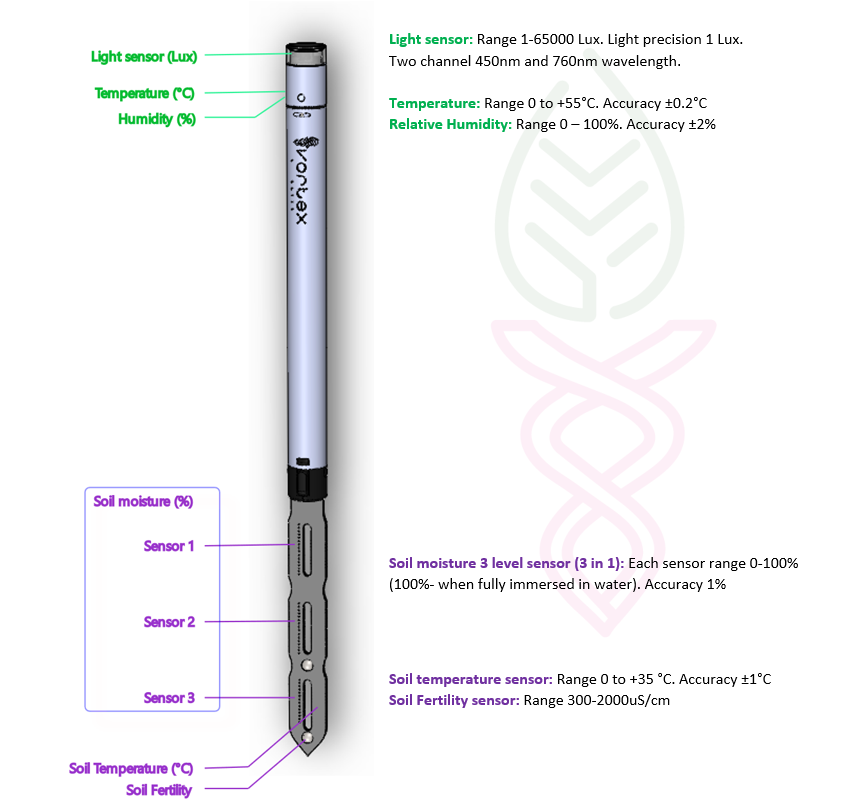
Other sensors
- Battery voltage sensor: 1.2 – 3.3V. Accuracy 0.05V
- WiFi signal strength: standard range shown in bars on the App screen. This sensor reflects the WiFi signal strength between the Vprobe and your home WiFi router. The further away the product is from the router the fewer bars are displayed on the screen.
- Soil temperature sensor: is also used internally to compensate for the temperature impact on the soil moisture and fertility reading.
Note: Fertility sensor is only supported on SN1000+ products. All products starting from SN1000 (Vprobe-SN00001000+) include the EC sensor with fertility measurement. If no fertility reading appears on the Plant Overview screen in Vplants app, your product was purchased/manufactured before 15 October 2025.
Warning: If two or more products are purchased at a time avoid mixing the 3-level sensors between products. These were factory calibrated for each product individually. To check yourself, see the serial number on the sensor blade which must match the serial number of the product label.
Caution
A. Do not install the soil sensor into the hard soil or through the surface covered with stones
B. Do not use the product at freezing or extremely hot temperatures
C. Remove any obstacles from the light sensor located on top of the Vprobe
D. Never put the Vprobe in water without the soil sensor attached. This will cause permanent damage to the product.
E. Do not swap the soil moisture sensors between the products. These were factory calibrated and may not work correctly if replaced.
F. Avoid placing the Vprobe in heavy rain or areas with direct, consistent water exposure. Prolonged exposure can damage the product or affect its performance.

For more information about how to use the product refer to How It Works? page on this website.
Batteries Replacement
A minimum recommended battery capacity: 1000 mAh
Best fit AAA battery: Duracell Optimum, Duracell Ultra, Duracell Plus, Energizer Max Plus EP92, Energizer L92, VARTA INDUSTRIAL PRO, Procell Intense PX2400
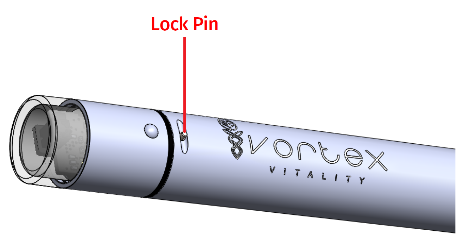
To replace the batteries: Unplug the 3 level soil sensor first. Then with the top end fixed press and hold the lock pin using your thumbnail or 1 penny coin while pulling the main tube off in a clockwise and anticlockwise motion to get access to the batteries…
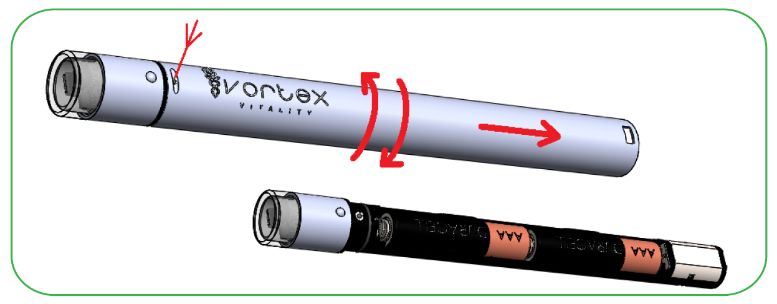
Watch this short video
Fault Finding (Vprobe LED indication)
| Vprobe LED status | Fault/functional description | Possible fix, where applicable |
| Flashing RED, full brightness | Incorrect Wi-Fi details entered during the Add New plant set-up process. | Update the Wi-Fi details via the WI-Fi Settings found under the plant menu. Or, delete the plant from the list and repeat the Add New Plant sequence again. This time make sure the correct Wi-Fi details were entered when prompted. |
| Wi-Fi AP (Access Point) is too far away for the Vprobe to connect. | Move the product closer to the Wi-Fi AP then briefly touch the top of the Vprobe (touch sensor) to initiate the connection. Observe the LED status. If the LED is no longer flashing RED that means the connection was successful. See How It Works? for more info about how to improve the Wi-Fi signal/coverage. | |
| Wi-Fi AP is not working properly or has no internet access. | Test the same Wi-Fi AP with your phone to ensure it’s working and the internet is available. | |
| Flashing BLUE, low brightness | Indicates that the RTC (Real Time Clock) synchronisation takes place. Can take 1-25 seconds. | Not a fault. The LED will stop flashing as soon as the Vprobe RTC synchronisation is complete. |
| Flashing GREEN, low brightness | Indicates that OTA firmware update is in progress. Can take around 1 minute. | Not a fault. Just wait until the update is complete. |
| PURPLE for 1 second, full brightness | LED lights up for 1 second and goes off. Indicates an initial power-up of the new product. The product is not yet linked with any plant. | N/A (Not Applicable) |
| A brief flash of PURPLE, low brightness | Indicates the product reboot/reset/power-up or wake-up from sleep condition on the configured product (Vprobe linked with the plant). | N/A |
| GREEN for less than a second, full brightness | LED lights up for less than a second and goes off. This behaviour can be observed during the setup process and indicates a successful connection to the internet over Wi-Fi. | N/A |
| GREEN for 1 second, full brightness | Indicates that Vprobe has entered the Magic Touch or Configuration ready to connect state and is waiting for the phone to connect. Behaviour observable 5 seconds after continuously touching the top of Vprobe to Add New plant or enter the MTouch (Magic Touch) mode. | N/A |
| Steady GREEN, low brightness, when touching the Vprobe | Continuation of the above. Indicates that Vprobe is either still awaiting or already connected to the phone via Wi-Fi direct for the MTouch or Add New Plant function. Timeout is 20 sec if no phone was connected. | N/A |
| Steady WHITE, low brightness, when touching the Vprobe | Indicates the response of the sensor to a finger touch. The LED goes off as soon as the finger is removed. Indicates that sensor is working correctly but the product is not yet configured (not linked with any plant). | N/A |
| Steady AMBER for 1 second | Confirmes that the Factory Reset took place after the factory reset sequence was executed. See the “Factory Reset” for more info. | N/A |
| Flashing PURPLE | Indicates that Vprobe resets every time when it tries to connect to Wi-Fi. The main reason for that is the batteries either discharged or of a low capacity and not suitable for the product. | Replace the batteries. See the Batteries Replacment section for more details. |
Factory Reset
Can be used to put the product back into the factory state. This operation will wipe off all the user relating data and any left sensors data. It can be used when transferring ownership of the product or recovering the product back to a working state in case of some unexpected software error.
Please note, this operation will delete all the user relating setting such as Wi-Fi SSID and password, the linked plant name and others. The product will no longer be able to send data to the Cloud unless it was re-linked with a new plant again.
To execute the reset: Tap the touch sensor 10 times within 7 seconds until the LED goes AMBER.
Product compliance

Contact details
Manufacturer
Vortex Vitality Limited,
71-75 Shelton Street,
London,
WC2H 9JQ,
UNITED KINGDOM
E-mail: support@vortexvitality.uk