Introducing the Smart Soil Moisture Meter, your AI-powered plant genius. With cutting-edge technology, this intelligent plant sensor ensures your plants thrive effortlessly. Here’s how it works:
Effortless Plant Care
- Simply place the Vprobe in your plant’s pot, snap a photo, and connect via Wi-Fi.
- Our advanced Plant ID API identifies your plant species from a database of over 700 plants.
- The intelligent plant sensor then sets optimal thresholds tailored to your plant’s needs.
Actionable Insights for Healthy Plants
- Receive notifications for essential actions like watering, repotting, or relocating your plant.
- Customise your notification settings to fit your schedule, ensuring you’re informed without interruptions.
AI-Driven Precision
- The Vplants App adapts and learns from your interactions, offering increasingly accurate care tips.
- The Vprobe plant sensor learns and ajusts to your plant’s unique needs, providing tailored care and recommendations for optimal growth.
- Quickly check the health status of all your plants on the ‘My Plants’ screen for peace of mind.
Embrace the Future of Plant Care
- Optimize your plant care routine with our Smart Soil Moisture Meter.
- Keep your plants thriving effortlessly.
Experience the convenience and precision of AI-powered plant care. Keep your plants healthy and happy with minimal effort.
For a complete product specification follow this link: User Manual
Contents
- How to use the App
- Add Your First Plant
- My Plants screen (Home screen)
- Plant Overview screen
- Data graphs
How to use the App
For Android phone: find the Vplants on Google Play Store, download and install it on your phone.
For iOS devices: find the Vplants on Apple App Store, download and install on your phone.
Register with an account
The first screen you’ll see after installing the App is the Login screen. Vplants require an account to be created for each user before App would securely store your plants data and other user relating information. To create a new account, you have two options:
A quick social sign up with Google or Facebook
This is the quickest option for you to start using the App if you already have an account with either of two social providers Google or Facebook. Click on the Google or Facebook icon to proceed…

Create native account
Create a new account by entering your name, email and password. To do so click on the ‘Register’ text field to access the registration screen…

Enter your details, click on the ‘REGISTER’ button and follow instructions to verify your email. Once registration is complete you will be redirected to the home screen in the App automatically.
Add Your First Plant
Once the new account was created you can now add your first plant to the list.
NOTE: at this stage we assume you already have a least 1x Vprobe product purchased from Amazon. If not, please search for “Vortex Vitality Vprobe” on amazon.co.uk to purchase your first product.
To add your first plant, use the ‘+’ icon in the right bottom corner on the ‘My Plants’ screen. Click on it…

Step 1: Insert Vprobe into the soil
At this step you need to decide which plant you are going to monitor and then link it with the Vprobe.
AVOID PLACING OUTDOORS IN THE RAIN: Vortex Vitality Vprobe is IP65-rated, meaning it is protected against dust ingress and can withstand low-pressure water jets from any direction. This makes it suitable for indoor use, greenhouses, or outdoor areas with overhead cover like a canopy or roof. Avoid placing it in heavy rain or areas with direct, consistent water exposure, as prolonged exposure can damage the product or affect its performance.
Insert the soil sensor into the soil and follow the instructions below:
- Depending on the pot size we recommend placing the Soil Sensor not too close to the plant steam but rather in the free from leaves and other obstacles area and no closer than 1 inch away from the wall of the pot.
- Insert the 3-level Soil Sensor at its full depth as shown below. For the best and accurate readings, all 3 sensors must sit in the soil with no airgaps around them.

- Warning: Do not install the soil sensor in hard soil or soil covered with stones or other hard and sharp objects which may damage the sensor.
- Keep the top of Vprobe clear from leaves, branches, etc, if possible. Doing so will improve the antenna performance and will allow for the light sensor to function correctly.
- Ensure the light sensor is pointing in the right direction -> toward the brightest light source in the room and the Vprobe top (where the sensor is found) is free from leaves and other obstacles. Refer to the below image…

Once the Vprobe was installed click on the ‘Next’ button to take a photo of your plant.
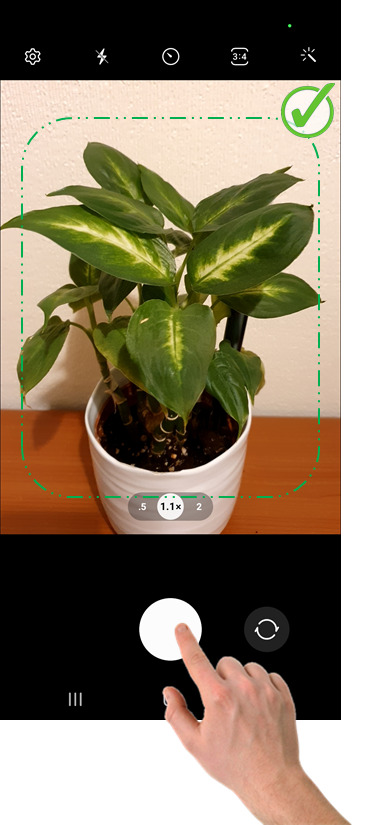
Step 2: Take plant photo
Vplants uses the PlantNet to identify plant species. This allowed us to significantly speed up the development and save costs as a result come up with a better and cheaper product for you. Moreover, we can now concentrate on the AI and other technical aspects of this constantly improving product and leave the hard work of plant identification in the safe hands of the PlantNet team. All credits for the plant identification are to PlantNet.
Vplants may submit up to 5 photos per plant for identification. And in 80% of cases, the plant will be identified from the first attempt, however, in some occasions, the App may ask you to take 2 and more photos of the same plant before it can be identified. Vplants will let you know in case more photos are needed.
For the best results:
- Ensure your phone camera is not using any filters/effects applied to the image.
- When taking plant photos make sure there is one plant in the capture, not a variety of different plants together.
- There is enough ambient light.
- Plant photo is clean, sharp and focused.
- If the plant size is small (10 inches and less) make it fit the screen as shown in the image above.
- If the plant is bigger than 10 inches take a close-up image with around 1/3 of the plant. Try different options to see which one works best for your plant.
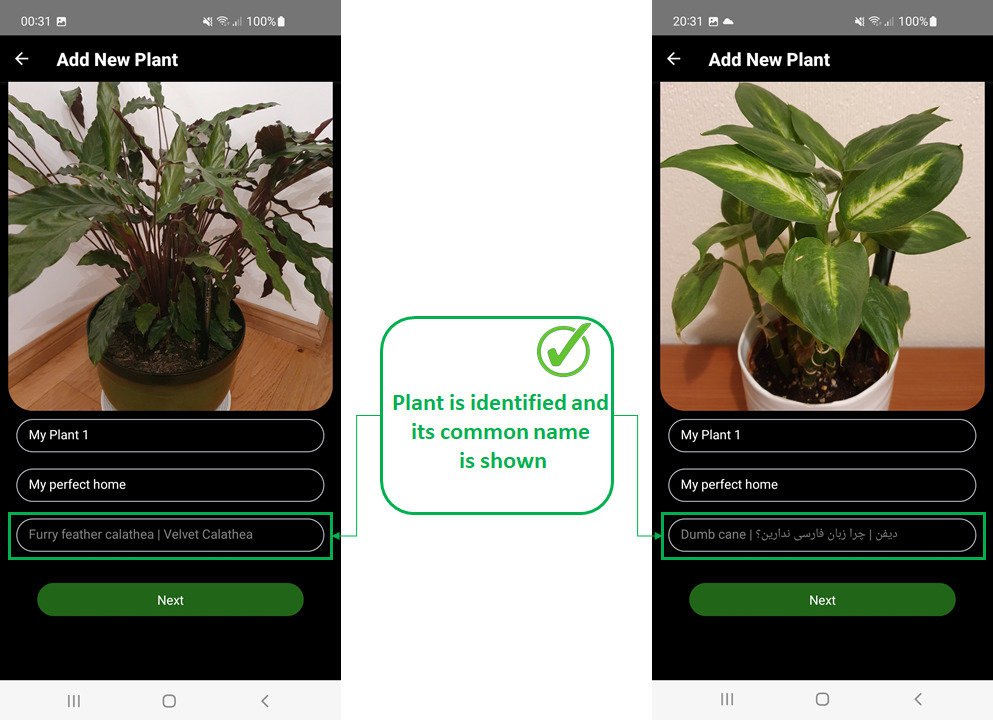
Plant identified Ok
Once the plant was successfully identified Vplants will use its name to retrieve the thresholds and other information from the Vplants database which consists of more than 700K plant species.
Identification in Progress
There may be occasions when Vplants can fail to identify your plant species because of different reasons, for example, the plant is too far away from the camera or not found in the PlantNet database, image quality is not as expected, the plant is not the actual plant, and other. If this happens Vplants will display the ‘Identification in progress’ message…
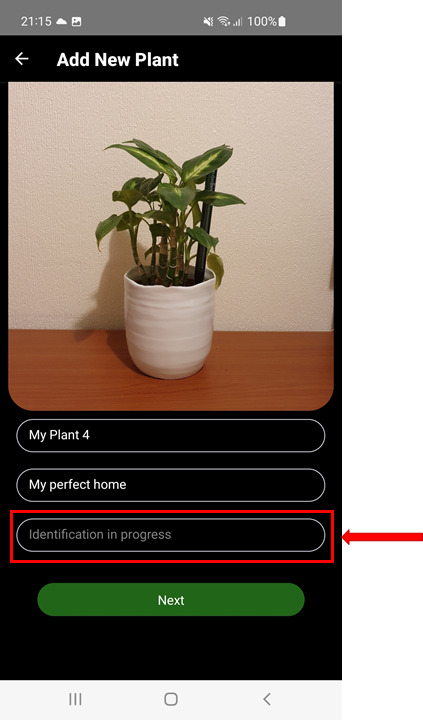
When this happens the App will automaticly notify our support team, therefore your plant will be identified by our team in a matter of hours. So, don’t worry if you see the ‘Identification in progress’ text instead of the plant name, just carry on with the set-up process and allow some time for your plant to be identified after. Alternatively, if you know your plant well you can add it to the PlantNet database yourself and then try again. If PlantNet can identify your plant ok then the chances are that Vplants will also do. To add your plant to the PlantNet database follow this link: https://identify.plantnet.org/weurope/identify
Rename your plant

Plant name: A sensible and easy to remember name for your plant. You can use this option to give your plant a name which you can easily remember in order to differentiate it from any other plant in your list. The default name for each plant is ‘My Plant X’, where X is a number automatically incremented by the App with each new plant added. You can either change this name or leave its default name. You can always change the plant name at a later time using the ‘Rename this Plant’ option on the Plant Overview screen.
Plant location: The physical location of your plant in the house i.e. kitchen, living room, hallway, bathroom, conservatory, … You can change it or leave it to default (My perfect home). The same as for the plant name, you can always change the plant location at a later time using the ‘Rename this Plant’ option on the Plant Overview screen.
Step 3: Enter your home Wi-Fi details

NOTE: Vprobe operates with 2.4 GHz Wi-Fi networks only! The details entered on this screen are for the Vprobe to connect to the internet via your home Wi-Fi network. Vprobe is an IoT device and requires an internet connection. It will not work on the Wi-Fi network without access to the internet. The internet connection is a must for the Vprobe to receive OTA firmware updates, synch the real-time clock and send sensor data to the Cloud. Only the ‘Magic Touch’ function can work without the Internet.
The above Wi-Fi details are uploaded to the product at the last step of the Add New Plant sequence.
Entered details will be automatically saved to the device’s local storage and be reused the next time going through the Add New Plant steps. As such, there will be no need to enter these details again every time.
IMPORTANT: If there are two or more Wi-Fi routers in your household please enter the details of the one located closest to the actual plant (and its linked Vprobe). This will allow for the product to use a more stable communication to the internet and save battery. There stronger the Wi-Fi signal is the less battery will be used by Vprobe to send data to the Cloud. Vprobe WiFi transceiver will drop power proportionally with the signal strength from the router.
Final Step 4: Link Vprobe with the plant
This is the last step in the Add New Plant sequence. After this step, you will see your plant populated in the list on the home screen (My Plants screen). This step requires you to initiate the Vprobe set-up process for the Wi-Fi and other data to be transferred to the product and then used to connect to the internet.
Follow the instructions in the App, also explained here in more detail:
- Touch the top of Vprobe and hold it for 5 seconds until LED goes GREEN
- Remove fingers from the Vprobe. No physical contact must retain after this step for the product to correctly enter the WiFi-direct communication.
- Click the ‘Connect’ button. Here it’s important to note again that you must have your fingers removed from the Vprobe touch sensor by the time you click the ‘Connect’ button.
Important Notice: The set-up process will continue and complete regardless of whether the entered Wi-Fi details are correct or not, or your home Wi-Fi is down and there is no access to the internet. The product uses secure WiFi-direct communication to exchange configuration data with the Vplants App but it may not be able to connect to the internet later if the entered WiFi details are incorrect. Please always double-check your entered WiFi SSID and password before the final step. If the wrong details were entered you would see the Vprobe LED flashing RED indicating that the product can not connect to the internet. And to fix that you can update the Wi-Fi SSID or password via the WI-Fi Settings under the plant menu. Alternatively, you can repeat the ‘Add New Plant’ steps, but this time enter the WiFi details correctly on the WiFi settings screen. The old details will be there for you to check. Once entered the details get saved to the phone’s internal memory.
N710: Vprobe is OFFLINE
If you see the “N710: ‘🌐❌ Vprobe is OFFLINE” message in the App after the new plant was added that means that the Vprobe could not connect to the Cloud over the internet to send the initial sensors data. And there will be a few reasons for that.
Reason for the N710 message: No data was received from the Vprobe after the setup. This can happen if the entered Wi-Fi details are incorrect or Vprobe is too far away from your home Wi-Fi router.
Touch the top of Vprobe for 1 second and check the LED status. If LED is flashing RED that means that Vprobe is not able to connect to the internet over your home Wi-Fi network.
How to fix the problem
- Ensure the top of Vprobe is not covered with leaves, branches or other obstacles reducing the antenna performance.
- Update the Wi-Fi details via the WI-Fi Settings found under the plant menu. Or, add the same plant again. Make sure this time you enter the correct Wi-Fi details (SSID and password) before the last step in the “Add New Plant” sequence. The old details will be there for you to check.
- Ensure you entered the details for a 2.4 GHz Wi-Fi network. Vprobe is not compatible with 5 GHz Wi-Fi networks.
- Ensure your Wi-Fi router is configured to use WPA2 security. Vprobe may not support WPA3 unless its firmware has been updated to version 2.2.0 or later. See the Wi-Fi security WPA, WPA2, WPA3* for more details.
- Improve coverage of your home Wi-Fi network. The same steps apply as per Weak Wi-Fi indicator guidelines.
It’s important to note that there may be dead zones in your home Wi-Fi network if your home size exceeds the average with only a single Wi-Fi router in use. The Wi-Fi signal from the router is normally strong but may struggle to reach the far ends of your home if your home is large with multiple floors etc. In such case please consider adding a Wi-Fi Booster/Repeater/Extender device to extend the coverage of your home Wi-Fi network in the area where the Vprobe is placed. On the Android device, Vplants App allows you to quickly test your home Wi-Fi network coverage before the new plant is added or after the N710 error was shown. See the Wi-Fi Settings found under the plant menu on the Plant Overview screen.
To test the product for a poor Wi-Fi reachability issue: Pull out the Vprobe from the plant pot and move it closer to your home Wi-Fi router i.e. locate it 0.5-2 meters away from the router (a device that provides wireless internet in your home). Initiate the connection by touching the touch sensor on Vprobe for 1 second. See the LED status. The LED should stop flashing RED once the connection was successful. Now go to the Plant Overview screen of the plant which triggered the N710 message and check the sensors’ readings. The readings should be now populated with new data meaning the connection with the Cloud was successful. See the ‘Fault Finding’ section in the User Manual for more info.
My Plants screen (Home screen)

This is the main screen which gives a quick overview of all plants’ health. Each plant widget consists of:
- Plant image on the left
- Plant health bar on the right
- Plant name, common name, location + two indicators in the middle
This screen can accommodate up to 50x plants. The list is scrollable with the most recently added plant on the bottom. Vplants will remember the date when the plant was added and will sort the list in ascending order, with the oldest date on top.
Main menu
You can use this menu to edit or delete the account, reset the password, access the support request form, review the App documentation as well as log out the current user.
Support
Please use the ‘Support’ option to quickly contact our support team and report any issues if found. Our offices are UK based and we will try to respond to all your requests as soon as it practically possible.
Delete Account
To comply with our Privacy Policy which you can find on our website we are legally required to provide you with an option to delete all your data from the App and the Cloud if you decide not to use our services anymore. To do so you can use the ‘Delete Account’ option found under the ‘Edit Profile’ in the main menu which allows to delete all of your data from our system. Please note, once the account was deleted there is no way back to reverse this process, all of your data will be unrecoverable.
Plant photo
This is normally the first photo of the plant (out of 5 maximum) taken during the add new plant steps.
Plant name, common name and location
These are the plant name and location given to the plant during the Add New Plant process and can be updated through the Plant Overview screen.
Common name is the plant specific name assigned automatically upon the successful identification of the plant species.
NOTE: if Vplants has filed to identify your plant this name will be replaced with the ‘Identification in progress’ until identified by the Vortex Vitality team.
Health bar
Health bar is the vital indicator reflecting the current plant health. Used to quickly identify your plant health status and needs.
There are 3x levels the bar can display:
FULL GREEN – The full green bar demonstrates the ability of the plant to grow well and be healthy. No care is required if you see the GREEN bar next to your plant. Your plant is thriving.
HALF ORANGE – meaning that the plant’s health is just about or already affected by the different factors and can be improved. The factors which may have such an impact are the following, but not limited to: the air temperature went outside the recommended range for the plant, the moisture content in the soil reached the minimum but not yet critical. Sunlight deficiency is detected which slows down the plant’s growth but is not yet critical for the plant’s health, etc.
ONE QUORTER RED – urgent care is necessary for the plant’s healthy growth. When the health bar turns RED it means that there will be at least one to do task pending. Click on the plant widget (plant photo, name or the health bar) to access the Plant Overview screen which will display the message, found under the plant name and location. The most common cause for the bar to go RED is when it’s time for watering.
Weak Wi-Fi indicator
This indicator is not normally visible (stays hidden) and is only shown when the Wi-Fi signal is too weak for the Vprobe to communicate reliably with the router. If you see this indicator it means your home Wi-Fi signal cannot easily reach the Vprobe and its plant. Below are the possible solutions how to fix it:
- Ensure the top of Vprobe is not covered with leaves, branches or other obstacles which may detune the antenna and decrease its performance. The top of the Vprobe must be clear from any leaves or other obstacles. Allow for a minimum of 10mm air gap all around the top of the Vprobe for the antenna and the light sensor to function correctly.
- Change the Wi-Fi channel on your router to the one least used in your neighbourhood. If there are too many Wi-Fi routers in your area and all are using the same Wi-Fi channel then your Wi-Fi speed and coverage will be drastically reduced. See your Wi-Fi router manual on how to change the channel.
- Set the 2.4Ghz Wi-Fi channel manually to any of the following: 6, 7, 8 or 9, whichever is available. The Vprobe performs best at the middle channels 6, 7, 8 and 9 when it comes to a stronger signal needed to pass through a few more walls.
- If nothing helped consider moving the plant closer to the Wi-Fi access point (your home Wi-Fi router) or adding an additional Wi-Fi Booster/Repeater/Extender to improve the coverage of your home Wi-Fi network.
How to change the Wi-Fi channel on your router
Enter the http://192.168.0.1 in the browser and hit enter then login to access the router settings, see the user manual for your specific device. Below is an example demonstrating how to change the channel on the Virgin Media Hub 3, 4 and 5. The Wi-Fi channel can be selected manually by going into Advanced settings -> Wireless -> Wireless signal

Wi-Fi security WPA, WPA2, WPA3*
IMPORTANT: The Vprobe Model 1 is designed to work exclusively with 2.4 GHz Wi-Fi networks and does not support WPA3 encryption out of the box. If your router or access point is configured to use WPA3-Personal only (without WPA2 fallback), the Vprobe will fail to connect to the internet. In this case, the LED will flash red to indicate an error. To avoid this issue the WPA2 security must be added/enabled. The best WPA2 Wi-Fi security is the WPA2-AES or you can have both enabled if your router supports this option i.e. you can have both WPA2-AES and WPA3-personal enabled in your router settings so the devices using the WPA3 can continue benefit from the latest security protocol. Below is an example of how to enable both security options in the TP-LINK Archer C64 Router. Refer to the user manual for your specific device to find out how to change the setting on your router.
Enter http://tplinkwifi.net in the browser and hit enter then login to access the router settings (see the label on the bottom of the router for the login details). Go to the Wireless tab and select the WPA3-personal+WPA2-PSK[AES] from the list of security options:

Below is an example demonstrating how to change the Wi-Fi security on the Virgin Media Hub 3, 4 and 5. The Wi-Fi security can be selected from the dropdown list: Advanced settings -> Wireless -> Security

* Firmware Update (WPA3): Vprobe Model 1 does not currently support WPA3 security from the factory. And if you think making a switch back to the WPA2 is not an option please get in touch with the Vortex Vitality support team. We can release an OTA firmware update for your product which will then allow the product to connect via the WPA3. However, for the update to work you would still need to temporally switch your router to WPA2 and then contact the Vortex Vitality support team quoting the serial number of the product. The update is normally pushed within 48 hours after the request was acknowledged.
Replace battery indicator
As the name says, this indicator is only visible when 2x AAA batteries need replacing in the product. It will pop up if batteries voltage is extremely low. In the normal operating scenario this indicator is never shown (stays hidden).
Plant Overview screen
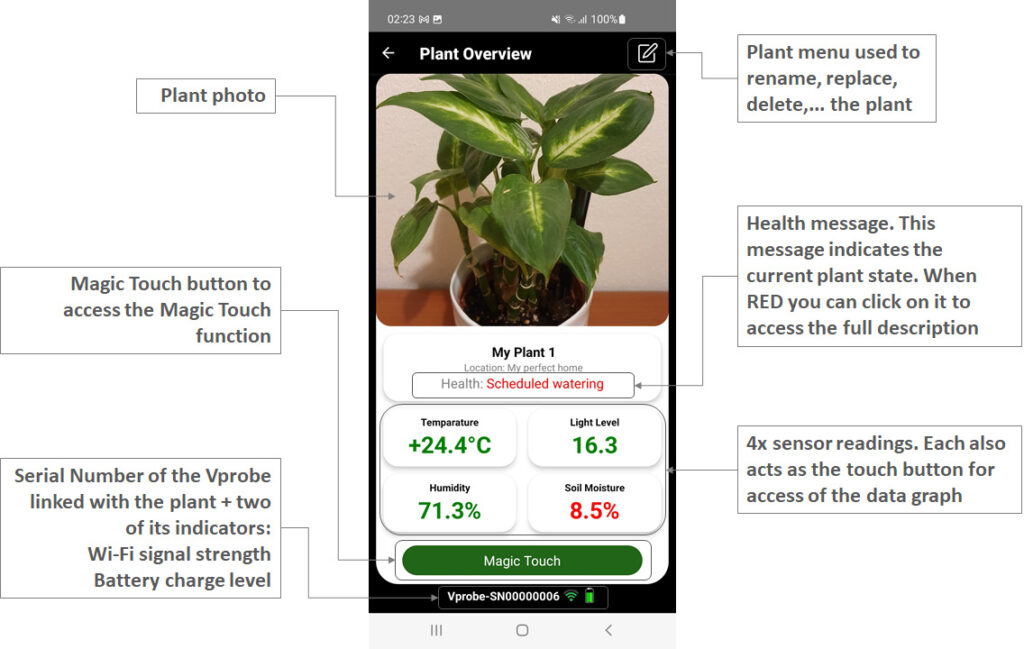
Plant photo
It’s the photo of the plant taken during the Add New Plant steps. This is normally the very first photo if more than one was taken. Currently, there is no option to replace this image in the App after the plant was added. But we will add this to the plant menu in the future.
Plant menu
Provides a list of options for the plant

About this Plant
This option allows reviewing the plant-specific details, such as generic name, group, grown size, toxicity and other. It’s not intended to include any care specific instructions for the plant. We have intentionally removed this content to simplify the process for our users. We encourage users to rely on the App and its intelligence to assist them with the necessary care when the time comes. If notifications are enabled the message will inform you about the necessary actions to take for the plant to be happy. If notifications are disabled you can always check the plant health by going to this ‘Plant Overview’ screen and see whether there are any to-do tasks pending. If for whatever reason the Vprobe fails to send data to the Cloud for 4 and more days, the error notification message (N711: ❌ No response from Vprobe) will be pushed to the phone and logged on the ‘Plant Overview’ screen. By going to the ‘Plant Overview’ screen and clicking on the info icon next to the error message a full description can be accessed. In the description, you will find an explanation of the fault and how to fix it. As such App employs a number of protection measures to minimise any possible chance for your plant to become abandoned, forgotten and killed.
Rename this Plant
You can use this option to change the plant name and its location. Your chosen plant name here is the actual name you are going to see in each notification for this plant. Therefore, we advise you to use this function wisely to rename your plant in the best sensible way for you to easily recognise it in the notification. This helps if you have more than one plant in your list.
Delete this Plant
This function allows to deletion of the plant and all its data. Once the plant is deleted you can no longer get access to its stored data or any other information associated with it. Only use this function if you are sure that you don’t want to keep any plant data on the device and in AWS Cloud for this plant.
Replace this Plant
Allows for a quick plant replacement without a need to go through the entire Add New Plant process. It allows quickly switching the plant by reusing the same Vprobe product. But here is important to understand that after the product was moved away from the old pot to a new one the Vplants can no longer guarantee that the new plant is the correct one associated with the Vprobe shown on the screen. Once Vprobe was moved the Vplants cannot know whether it was the same Vprobe that was moved and become linked with the new plant. Although you can always check yourself by putting the Vprobe in the Magic Touch mode and comparing its Serial Number. The Vprobe Serial Number is displayed as the first thing during the Wi-Fi connection to the product and has to match the Vprobe-SN number displayed on the bottom of this ‘Plant Overview’ screen.
To avoid any issues, make sure you follow these simple steps to minimise chances of the Vprobe being mixed and re-used with the wrong plant, in situations when more than one product is owned by you:
- Open the Vplants App and select which plant you want to replace by going into its “Plant Overview” screen.
- Physically get to the plant and pull out the Vprobe from its pot.
- Now click on the ‘Replace this Plant’ option in the plant menu while carrying the Vprobe in your hand.
- Position the Vprobe to a new pot with the new plant.
- Finally, take a photo of the new plant, as App tells you, and click on the ‘Replace’ button after the new plant was identified.
NOTE: at this point, if you see the ‘Identification in progress’ message on the screen instead of the identified common name, don’t worry. Proceed with the ‘Replace’ plant and allow some time for your plant to be identified by the Vortex Vitality team. You’ll receive a notification update as soon as the plant was identified.
Threshold settings
This menu option allows the user to access the threshold settings screen. The threshold settings can tell the user when the notifications are triggered or indicators turned RED/ORANGE/GREEN. Click any info icon found on the “Threshold Settings” screen to learn more about each setting and its function.
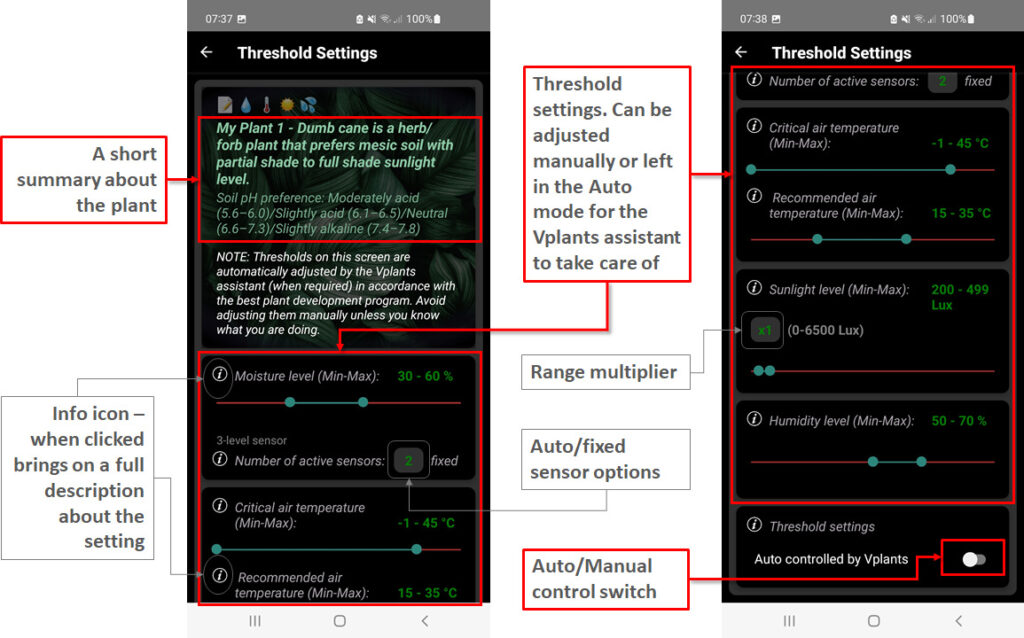
By default, Vplants will use the Auto control mode with each new plant added. In this mode, the threshold settings are controlled and adjusted automatically by the Vplants assistant to reflect the seasonal change and growing plant requirements. This is a ‘Peace of Mind’ option by passing full control over to the Vplants intelligent assistant and you just observe the changes.
NOTE: Although we do everything possible to improve our system and services there may still be some minor gaps and errors. The Vplants assistant algorithms are improving every day with the huge help of our development team and data collected for each individual plant, BUT please bear in mind that these cannot be treated as perfect in all respects and therefore Vortex Vitality cannot promise or guarantee any desired/expected/accurate results from using the service. Please refer to our Terms of Service for more details. The manual control option is there for you in case you think the assistant is not in the right mood for your plant.
To manually control the settings, flip the Auto/Manual control switch to the right. Doing so will unlock the settings ready to be adjusted manually. Here is important to note, that in the manual mode, some of the AI functions will be deactivated due to Vplants inability to control the thresholds. In the Manual mode user is responsible to adjust the values to match the seasonal change and others.
Info icon – can be found next to each setting and can be used to access a full description of the setting and how it works. Wherever you see one in the App click on it to open the info description. Please use this option to find out more about each setting and its function.
Wi-Fi settings
This option allows to change or update the Wi-Fi SSID and password required by the Vprobe to connect to the internet over your home Wi-Fi network. Make sure the details entered on this screen match the details of your home Wi-Fi network. If these were entered incorrectly Vprobe will fail to connect to the internet and to the Cloud, and App will display the connection error (with the RED LED flashing on Vprobe).
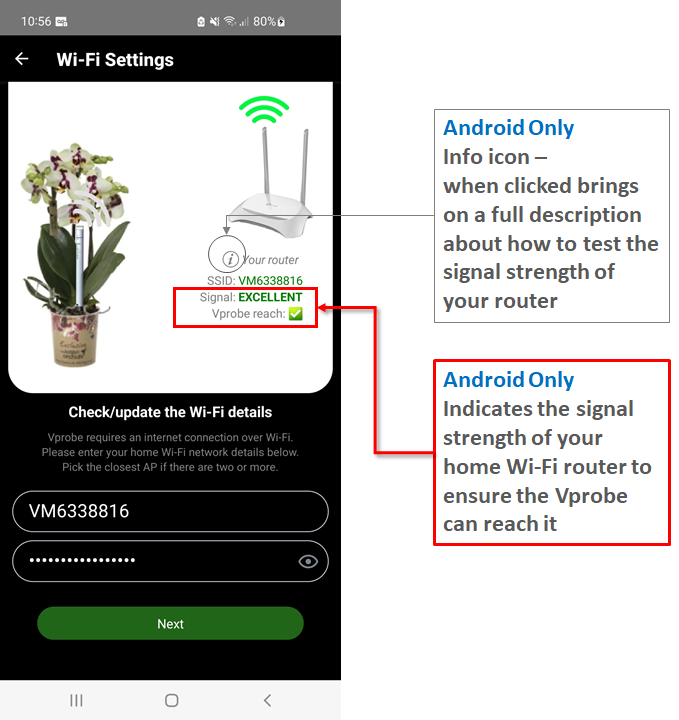
On the Android platform, it’s possible to test your home Wi-Fi coverage (signal strength) to ensure the signal is good enough for the Vprobe to communicate reliably. You can use this simple tool to test the signal strength in different locations around your home by moving the phone and checking the status. The signal strength around the plant pot must be shown as PERFECT, EXCELLENT, GOOD or at least FAIR for the Vprobe to reach the router (internet access point). Click on the info icon in the App to access a full description.
Reports
Click on the Reports to open the Reports screen.
The reports screen provides a historical health overview for this plant, where “this” stands for the plant on the Plant Overview screen via which the Reports screen is accessed.
On the Reports screen, you can find an overview of the plant’s health for the last period; the period is stated in the report itself. Each report is generated automatically upon completion of the evaluation cycle and summarises all the advisory items and recommended actions to be taken by the user to maintain the plant’s health and its growth. Any advisory actions on the report, if found, only apply to a period stated in the report plus a few more days needed to execute them. The report shall no longer be treated as accurate if more than 3 days passed after it was released because the plant exposed conditions may have changed i.e. user opened the report a week after it was generated but the plant has been moved to the correct location already and therefore actions stated on the report no longer apply.
The period covered by the report may vary significantly depending on how long it takes for the Vplants assistant to collect and process a full set of data. For example, there may be a number of variables taken into consideration before the necessary action is proposed by the assistant to minimise user interaction and possible error. For example: during the winter season a high ambient humidity may be resolved by a temperature increase in the room (which was found to be below recommended at the time) and therefore assistant will prioritise an option to increase the temperate in the room first (if possible) before the plant can be physically relocated. If an increased temperate did not resolve the case or the user has not responded by increasing the temperature assistant will try again or offer the second option.
Notifications
You can enable or disable the push-notifications for this plant or for all plants in your list.
IMPORTANT: Please disable all but not Vplants notifications if possible! This way you’ll never forget to water your plant. Let the plant speak for itself!
We truly value everyone’s time and therefore with this in mind we made an option in the App to select a time when all notifications are pushed together. This helps to organise your daily routine and water your plants at a regular time of the day whenever that day comes (notification will arrive). Based on the best plant watering practices Vortex Vitality recommends setting your notifications to a time of your preference between 5:30 and 10:30 o’clock in the morning. The default setting is 10:30 am for each newly added plant. Each plant can have its own time setting but we recommend keeping it the same for all plants.
Notification content: Each notification consists of all messages for the single plant. Where each message is telling the reason and action required to take to maintain the plant’s health. Below is an example of the notification received for my second plant (My Plant 2) which at the time required watering and more sunlight.

After the notification is clicked the Vplants App will open and load your plants’ list. Click again on the plant with the RED health bar – the plant which triggered the notification. This action will open the plant’s overview screen where the message is shown. Click on the message text or info icon to access a full description. See the next paragraph for the details about the health message content.
Plant Health message

Each plant health is continuously monitored by the AI algorithms deployed on Cloud and when the conditions are exceeded the algorithm loads the notification message into the buffer ready to be pushed to your phone at the pre-set time slot. If conditions have changed to ‘good’ again before the notifications time comes the message will be removed from the buffer and so on. This allows you to manually override the state prior to the notification being pushed if you decide to water your plant earlier by seeing the red message on the Plant Overview screen.
Health message colour
Health messages can take 3 generic colours the same as for the health bar and data sensors. The colour picked by the App depends on the importance of the message and the plant’s health status:
GREEN – means that plant’s health is good and no care is required to sustain its well-being. Your plant is thriving. The green-type messages are normally those with funny and happy faces telling you that your plant’s health is good.
ORANGE – used to highlight any warning messages which do not carry the high importance meaning. Such can be just an advice message.
RED – plant health requires attention. These are the most important messages displayed to maintain plant healthy growth. If you see message highlighted in RED this means that there will be at least one to do task pending to keep your plant happy. If more than one message is queuing the preview of each message will be shown one after another with 1 second interval.
Mark task as complete
The primary function of the ‘MARK AS COMPLETE’ button is to confirm that all tasks were complete. It can be used to speed up the data analysis and let the AI assistant know that all tasks were indeed complete. Regardless of whether you clicked the button or not after the task(s) was(were) complete the AI assistant will carry on the analysis of any recent data and will update the screen indicators accordingly. However, there may be some data which takes days to be analysed, like sunlight, humidity, etc… before the AI assistant can act on it. So, your interaction with the App will help to speed up some tasks for the AI assistant. Based on the message type and its importance some messages may be seen over and over again until the task is complete. For example, if you received the scheduled watering notification but forgot to water the plant the next morning you will receive the same message, then the morning after another one and so on until App sees that the watering was applied.
4x sensor readings
These are the last recorded sensor readings for the plant. Vprobe completes 24 readings per day every day to assess the plant’s health. The last readings received from the Vprobe are the ones displayed on this ‘Plant Overview’ screen.
Typical data exchange behaviour
It’s important to understand how Vprobe is exchanging data with your App so you have a clear understanding of when your data is available. Wi-Fi is a power-hungry technology. To save battery and to keep the sensor readings consistent and close enough to have a wide and clear picture of the plant’s health we made Vprobe collect and then send data every hour. After the initial setup, data is sent hourly for 6 hours, then every 6 hours by default (this timing can be adjusted. See the Update Rate section). By default, the Vprobe samples sensor data every hour and stores it until it is sent to the cloud every six hours. The device can store up to 56 hours of data, ensuring no data is lost if your Wi-Fi or internet connection is interrupted. Once the connection is restored, the Vprobe will automatically retransmit the stored data.
How to force readings update
You can force the update and flush all the data from the device to your App at any time by touching the top of Vprobe for 1 second. Touch the top of Vprobe just long enough to see a LED glow and in 5 seconds your App will receive the data – all the sensors’ data up to the last hour. You can have your App opened on the ‘Plant Overview’ screen to observe this behaviour. Again, the data will come to your App every 6 hours normally regardless of whether you used the force update function or not. It’s only when you want to see an instant update just before any action in the to-do list for example, or to populate the graphs with the latest data you can use this function.
Click on any of the four sensor readings for the App to take you to the graphs screen.
Data Update Rate
New feature. Release date 19-07-2024:
You can now adjust how often the Vprobe sends sensor data to the cloud, which is then reflected in your app. By default, data is sent every 6 hours, but you can change this to hourly if you need more frequent updates, such as when using a Home Assistant integration. To adjust the update rate:
- Select the desired Update Rate by clicking the info icon next to the “Update Rate” text in the app when adding the new plant or when updating the Wi-Fi Settings. Refer to the below image.
- Ensure your product has firmware version v2.2.0 or newer. To check the firmware version, follow the new plant setup steps. If the firmware is outdated, a warning message will appear once the product connects to your phone. If your firmware is older than v2.2.0, please fill out the request form below to receive the update and unlock this new feature.

Keep in mind that more frequent updates drain the battery faster. Here are the estimated battery life durations for each update setting:
- Every 1 hour: Up to 2 months
- Every 3 hours: 3-4 months
- Every 6 hours: 6-10 months
- Every 12 hours: 10-16 months
- Every 24 hours: 16 months or more
These estimates assume a good Wi-Fi signal strength of -60 dBm or better. Stronger Wi-Fi signals will extend battery life.
Magic Touch
Each plant overview screen has a Magic Touch button, found under the 4x sensor readings. This button can be used to access the Magic Touch screen. Magic Touch is a function in the App which allows for a quick connection with the plant via the Vprobe to see its live data. This function can be useful to quickly test the soil moisture content of any plant in your house by going around the house with a single Vprobe, or just to check the environmental conditions for the plant in the pot.
In the Magic Touch mode, you can see all the sensor data with a 1-second update rate.
NOTE: avoid keeping the Vprobe in the Magic Touch mode for too long. This is because this function uses Wi-Fi direct communication and will drain the battery quickly. Because of this reason we made the Magic Touch session last a maximum of 5 minutes before Vprobe will disconnect automatically to save battery. Each session is monitored by the 5 min timer which is displayed under the plant pot image on the Magic Touch -> Vprobe Sensors screen.
Scan OFF/ON selection switch

Scan OFF/ON option is provided to manually override the App Wi-Fi setting for connection to Vprobe when accessing the Magic Touch live data screen.
On the Android platform, the position of the switch is the Android version dependant and will be either ON or OFF by default. On iOS, the switch is always in the OFF position by default.
Scan OFF – switch found in the left position. Tells Vplants to use the plant-linked Vprobe name to make a connection with the product when accessing the Magic Touch live data screen. In this state, the App will always use the plant-linked Vprobe name (its serial number) as the only SSID to establish the connection. On the older Android version, it’s the preferred option as provides a faster connection with the product.
Scan ON – switch found in the right position. Tells Vplants to scan for any Vprobe found in the rage and connect to the first found. This function is helpful in case you want to connect to Vprobe not linked with the particular plant. It allows you to connect to any Vprobe in the range.
On the newer Android, this is the preferred option because it works faster and provides a better user experience. But there is a limit put starting with Android 10 and higher: 4 scans in 2-minutes period, such limit does not apply to iOS. If the limit is reached, you can either wait for 2 minutes, switch the scan off (assuming the product is the right to connect to as per its linked plant) or disable the Wi-Fi scan throttling in the Android Settings -> Developer options.
Vprobe Serial number and its indicators

On the bottom of the Plant Overview screen, you can find the Serial Number for the Vprobe linked with the plant, the same plant which is shown in the image. These two get linked together during the last step in the Add New Plant sequence.
The indicators are the two sensors found in the device which report their states together with the other sensors when the Vprobe goes live (sends data to the Cloud).
Wi-Fi indicator
This indicator displays how far the Vprobe is from your home Wi-Fi router. More than one bar GREEN indicates a good and stable connection to the router; however, the more bars are displayed the better. Improving the Wi-Fi signal strength for the Vprobe can significantly extend the battery life time because Vprobe will drop its transmitter power proportionally with the signal strength. If there is only one bar left on this indicator and it’s highlighted red pay attention to how the Vprobe is positioned in the pot or find a way around how to improve the Wi-Fi coverage. The same Tips apply as per ‘Weak Wi-Fi indicator’ topic:
- Ensure the top of Vprobe is not covered with leaves, branches or other obstacles which may detune the antenna and decrease its performance. The top of the Vprobe must be clear from any leaves or other obstacles. Allow for a minimum of 10mm air gap all around the top of the Vprobe for the antenna and the light sensor to function correctly.
- Change the Wi-Fi channel on your router to the one least used in your neighbourhood. If there are too many Wi-Fi routers in your area and all are using the same Wi-Fi channel then your Wi-Fi speed and coverage will be drastically reduced. See your Wi-Fi router manual on how to change the channel.
- Set the 2.4Ghz Wi-Fi channel manually to any of the following: 6, 7, 8 or 9, whichever is available. The Vprobe performs best at the middle channels 6, 7, 8 and 9 when it comes to extra coverage needed to pass a few more walls.
- If nothing helped consider moving the plant closer to the Wi-Fi access point (your home Wi-Fi router) or adding an additional Wi-Fi Booster/Repeater/Extender to improve the coverage of your home Wi-Fi network.
Battery charge level
The battery charge indicator is there to display the battery state. The colour of the bar will change between green, yellow, orange and red based on the remaining charge level. Pay attention when this indicator turns RED, meaning it’s time to replace 2x AAA batteries found inside the product. See the User Manual about how to replace the batteries.
A minimum recommended battery capacity: 1000 mAh
Best fit AAA battery: Energizer Max Plus EP92, Energizer L92, VARTA INDUSTRIAL PRO, Procell Intense PX2400, Duracell Optimum, Duracell Ultra, Duracell Plus
Data graphs

Each graph data can contain up to 24 readings per day, where the date is selected using the date picker by clicking on the selected date field.
Vertical scale (Y – axis)
Reflects the sensor values in the measurement units: Degrees C for Temperature, Lux for Light, percentage for the Humidity and Soil Moisture. See the product spec for the covered range by each sensor.
On the top 3x graphs which are Temperature, Light Level and Humidity the graphs are automatically rescaled to fit the minimum and maximum values for that day. Soil moisture graph however will always start from 0%.
Horizontal scale (X – axis)
Reflects the time when reading was taken. It will shrink in accordance with the number of readings taken for that day to accommodate them all. A number on the horizontal scale just under each graph is the precise hour of the day when data was sampled by the Vprobe (i.e. 1 = 1 am, 2 = 2 am, 15 = 3 pm, and so on). Each graph is made to fit a maximum of 24 readings for the selected date. The first and last readings for the complete day always fall on 0 am for the very first and 11 pm for the last one. After the initial Vprobe setup the first graph will start from the next hour after the setup event. Therefore, there may be fewer than 24 readings (samples) displayed on the graphs for that day.
You can open or hide any of the four graphs by a fast click on the graph’s name to open it or a long press on the already opened graph to hide it.
Data export to businesses and 3rd parties
We welcome businesses in agriculture or just private companies to use our products, assuming these will be used within the greenhouses at temperatures above 0 °C, see the product spec for more details. We can add up multiple accounts to support any number of devices (subject to current stock and availability) and then export all the collected data in the required format. We have the ability to collect and export data on request for any number of products. All data is predominantly collected in the AWS Cloud and can be therefore securely and seamlessly transferred to its owner upon request and under the agreed terms. If it happens that your business is also using the AWS services then we can discuss the possible integration mechanisms. Please get in touch with any questions or ideas.
The content of this document is under the constant improvement and will keep growing with more services and functions added to the Vplants App and Vprobe product.
Thank you for being with us on this journey.
Best Wishes from Vortex Vitality